Night vision is traditionally considered an expensive segment of optics. For example, PVS-14 devices with Generation 3 electronic optical transducers (EOTs) typically cost between 3,000 EUR and 5,000 EUR, depending on the characteristics of the installed EOT.
However, as with a low-cost AR-15 rifle, you can save a lot of money by assembling the device yourself. If you have basic technical skills, assembling a night vision device is no more difficult than assembling a PC. Contrary to common industry misconceptions, it doesn't require specialized equipment or lab conditions unless you need to maintain quality metrics in each unit.
Some experts claim that without professional testing, you risk headaches, eye fatigue, or nausea. But these claims are often exaggerations, similar to those used by some gunsmiths to discourage do-it-yourself AR-15s.
With the basic tools and an understanding of the PVS-14 design, it is quite possible to assemble your own device.

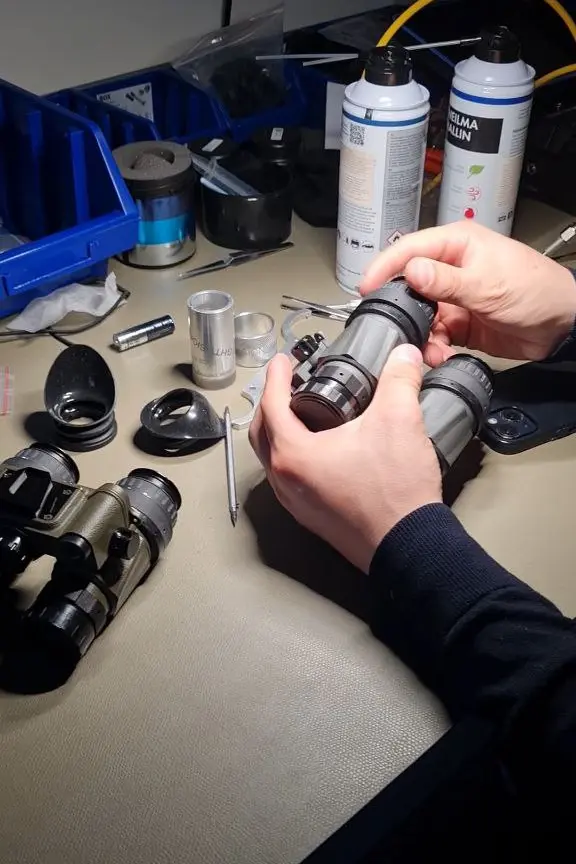
All components for assembling your own PVS-14
The easiest way to assemble the PVS-14 night vision device is to use the PVS-14 Housing Kit. This is similar to the AR-15 assembly kit, which contains all the necessary parts except for the lower receiver. In the case of the PVS-14, the kit includes all the elements except for the electronic optical converter (EOC).
A typical PVS-14 enclosure kit contains the following components:
- Battery housing (single battery configuration) (274422-2)
- Battery cover with cable (275113-2)
- Monocular main body (277705)
- EOP lock (5002569)
- Eyepiece 25 mm (5009545-1)
- Neck lanyard (A3144306)
- Purge screw (A3144315)
- O-ring for purge screw (A3144316)
- Lens cap (A3144318)
- Close focus stop (A3144322)
- Lens assembly O-ring (A3144323)
- Eyecup assembly (A3144422)
- Lens assembly (A3256342)
- Eyecup adapter (A3256354)
- O-ring between battery housing and monocular (A3256356-2)
- Light guide (A3256358)
- Lens retaining ring (A3256360)
- Napkin for optics
- Battery case screws ×4 (MS16995-2B)
- User's Guide (TM11-5855-30610)

Some of these parts are not critical but are included in the kit. The cost of such kits ranges from €500 to €1500 depending on the supplier, manufacturer, and type of enclosure. There are also upgraded options, such as the Vyper enclosure or the aluminum Hyper from DEP Technologies. Titanium retaining rings are available for increased strength or aesthetics, but they increase the overall cost.
Electro-optical transducers
There are two main types of electron-optical transducers (EOTs) used in U.S. night vision devices: MX-10160 and MX-11769. They are compatible with the PVS-14 form factor and differ in the presence or absence of a manual gain control function.
The MX-11769 supports manual gain control - the brightness of the image can be adjusted using the control on the body of the device. This type of EOS has a characteristic flexible cable (pigtail) that connects to the control circuitry. The MX-10160 does not have a pigtail and does not allow for manual gain adjustment.
In some cases, the pigtail can be removed from the MX-11769 to become the functional equivalent of the MX-10160 - this may be necessary for compatibility with enclosures that do not support manual adjustment or do not have room for additional cable.


European systems often use Photonis EOPs, in particular the ECHO and 4G series. They have their own form factor that is compatible with many modern housings, including binocular systems without manual gain. Most Photonis models do not have a pigtail, which makes them convenient for use in compact configurations. The ECHO, for example, has automatic gain control, and the 4G can be supplied with either manual or automatic gain depending on the modification.
For binocular devices without a pigtail connection, it is more appropriate to use an EOP without a manual gain function, such as the MX-10160 or Photonis ECHO.
Assembly of the PVS-14 battery compartment
The first step is to install the battery compartment of the PVS-14 monocular. In most cases, the main components are already pre-installed, but if not, follow the instructions below.
The power knob has a locking screw with a pin. A 0.050-inch hex key is required to tighten it. Be careful when installing: if the handle is not properly aligned, the pin will rest against the chassis and the hexagonal socket (the keyed socket, not the thread) can easily be broken off when you try to tighten the screw.
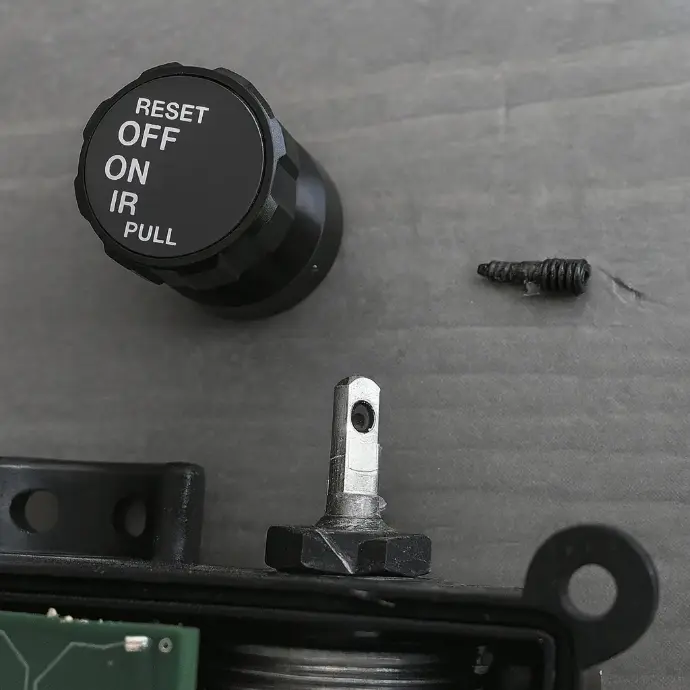
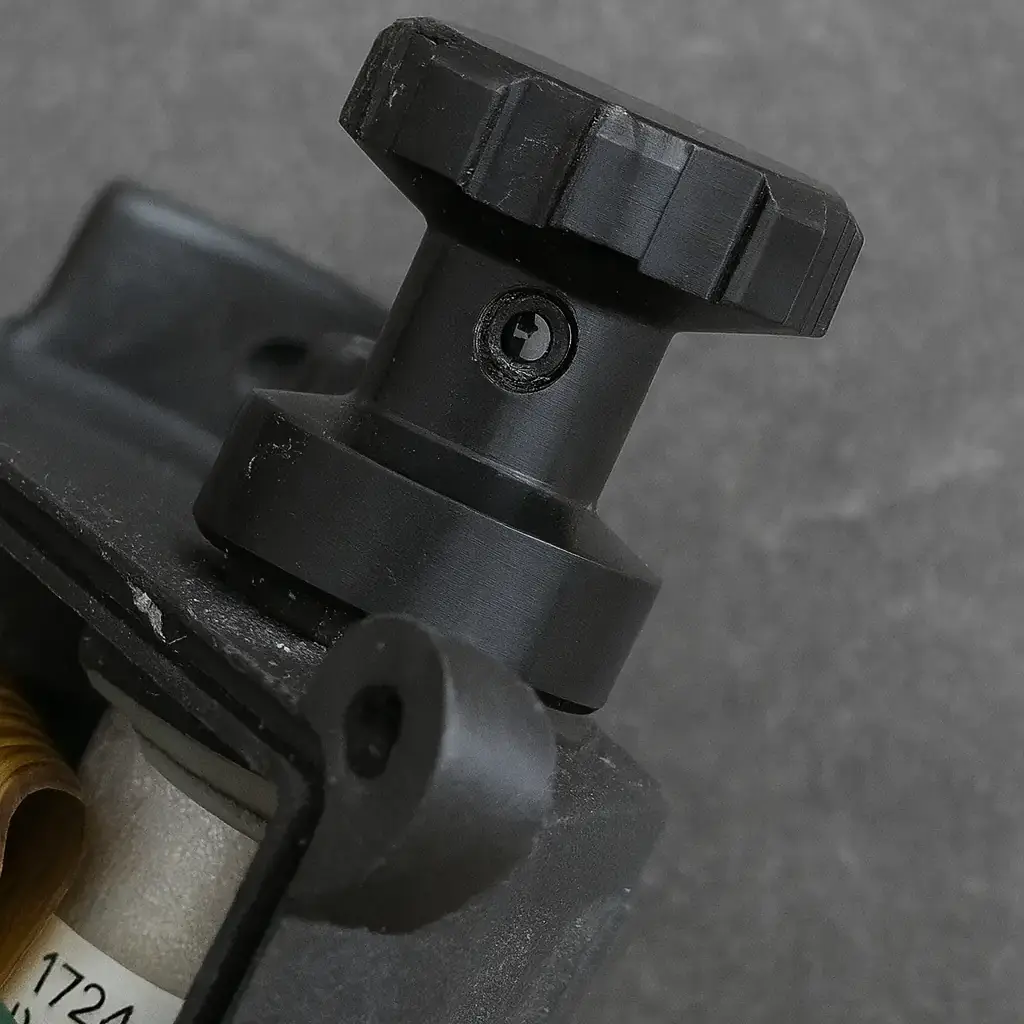
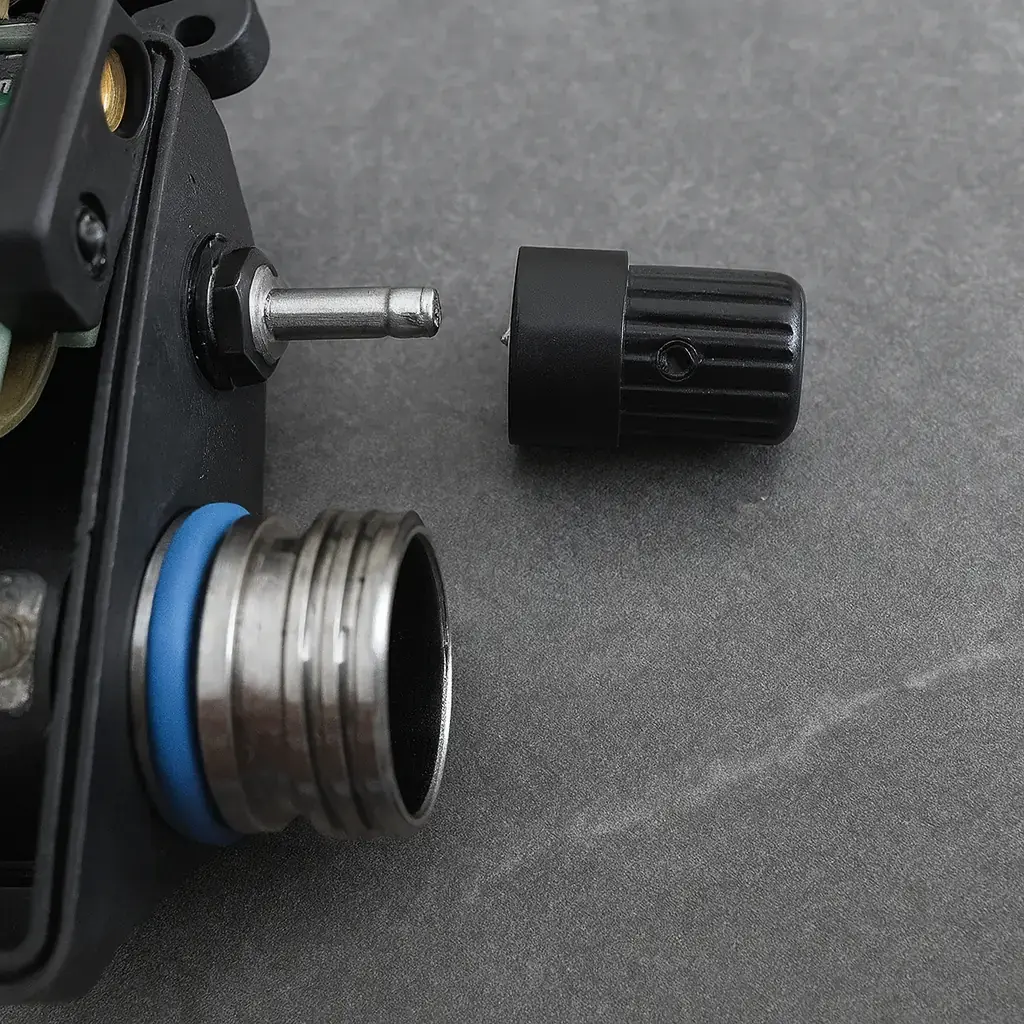
Next, install the manual gain knob. It is also fixed with a screw of the same size, but without a pin. Slide the knob onto the silver stem and tighten the screw into the special recess on the stem using the same 0.050-inch wrench.
Installing a lens in the PVS-14
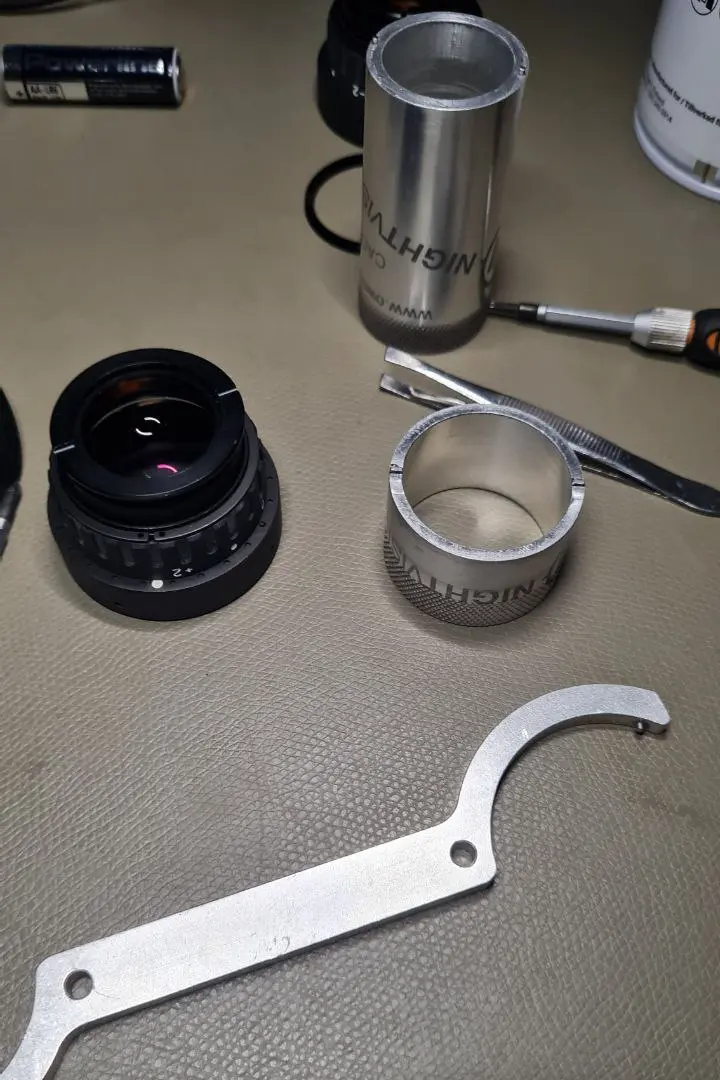
The second step is to install the lens into the instrument body. Before screwing in the lens, you must first install the lens retaining ring. Before mounting, you should also clean the back surface of the lens with a special optical cleaning pencil or eyeglasses cloth.
A close focus stop is provided, which is mounted on the inside of the body after the lens and retaining ring are installed. It prevents the lens from accidentally unscrewing from the body when focusing at close range.
Next, install the manual gain knob. It is also fixed with a screw of the same size, but without a pin. Slide the knob onto the silver stem and tighten the screw into the special recess on the stem using the same 0.050-inch wrench.
Installing a lens in the PVS-14
The second step is to install the lens into the instrument body. Before screwing in the lens, you must first install the lens retaining ring. Before mounting, you should also clean the back surface of the lens with a special optical cleaning pencil or eyeglasses cloth.
A close focus stop is provided, which is mounted on the inside of the body after the lens and retaining ring are installed. It prevents the lens from accidentally unscrewing from the body when focusing at close range.

The PVS-14 has a shallow depth of field: when focusing to infinity, objects in the vicinity will be blurred, and vice versa. To focus on close objects, the lens is cranked forward. If the stopper is not installed, excessive twisting can cause the lens to fall out. A stop is not essential, but you should be careful about the depth of screwing.
There are different variants of lenses for PVS-14. For example, one of them is typical for most devices of this series, the other is less common, the origin of which is unknown. In the second case, the thread is very tight, so it is advisable to use silicone grease to facilitate installation.
Mounting the battery compartment and the electronic-optical converter
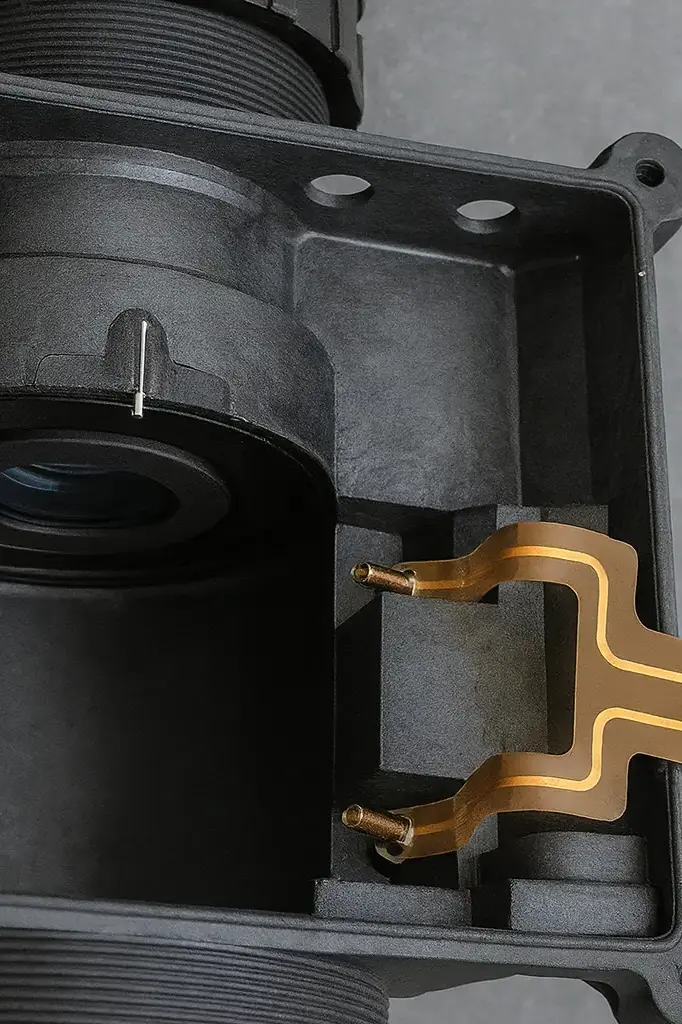
Connect the battery compartment to the monocular body. There are two small protruding pins inside the body, which correspond to the external pins on either side of the J-Arm threaded hole. A flexible cable (pigtail) with two wires extends from the battery compartment and should be connected to these pins.
A small flat-blade screwdriver is handy for making the contacts—it can be used to gently press the brass or copper cylinders to seat them firmly on the corresponding pins.
The PVS-14 has a shallow depth of field: when focusing to infinity, objects in the vicinity will be blurred, and vice versa. To focus on close objects, the lens is cranked forward. If the stopper is not installed, excessive twisting can cause the lens to fall out. A stop is not essential, but you should be careful about the depth of screwing.
There are different variants of lenses for PVS-14. For example, one of them is typical for most devices of this series, the other is less common, the origin of which is unknown. In the second case, the thread is very tight, so it is advisable to use silicone grease to facilitate installation.
Mounting the battery compartment and the electronic-optical converter
Connect the battery compartment to the monocular body. There are two small protruding pins inside the body, which correspond to the external pins on either side of the J-Arm threaded hole. A flexible cable (pigtail) with two wires extends from the battery compartment and should be connected to these pins.
A small flat-blade screwdriver is handy for making the contacts—it can be used to gently press the brass or copper cylinders to seat them firmly on the corresponding pins.
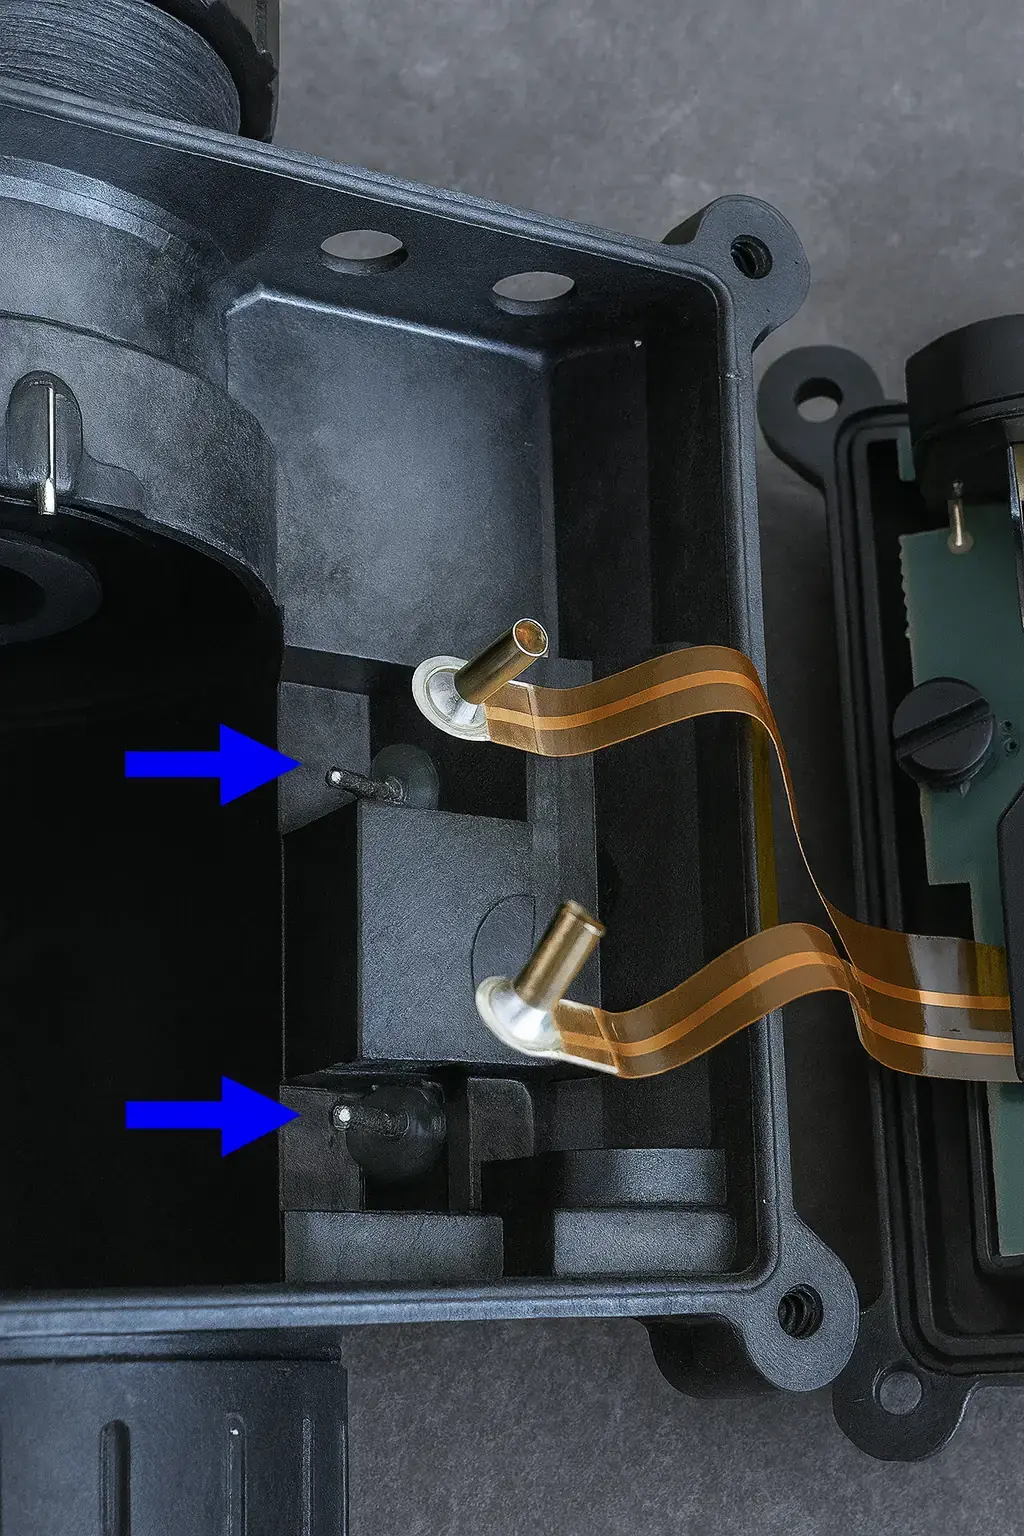
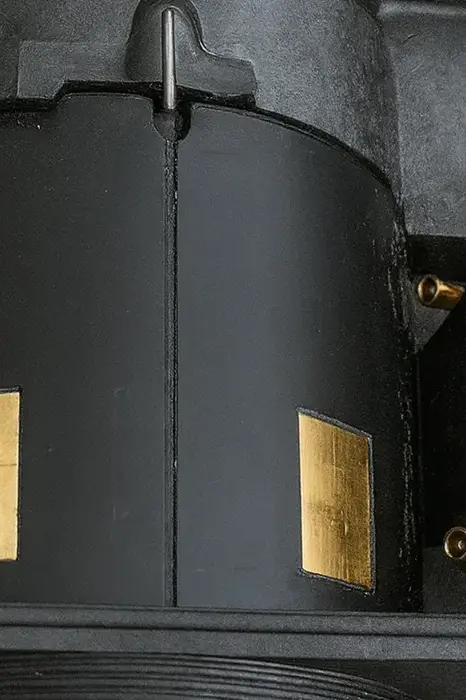
Inside the monocular housing is a metal pin that is epoxied to the monocular body. This is an anti-rotation lock that keeps the electron-optical transducer (EOT) in the correct position after installation.
Installation of the EOP
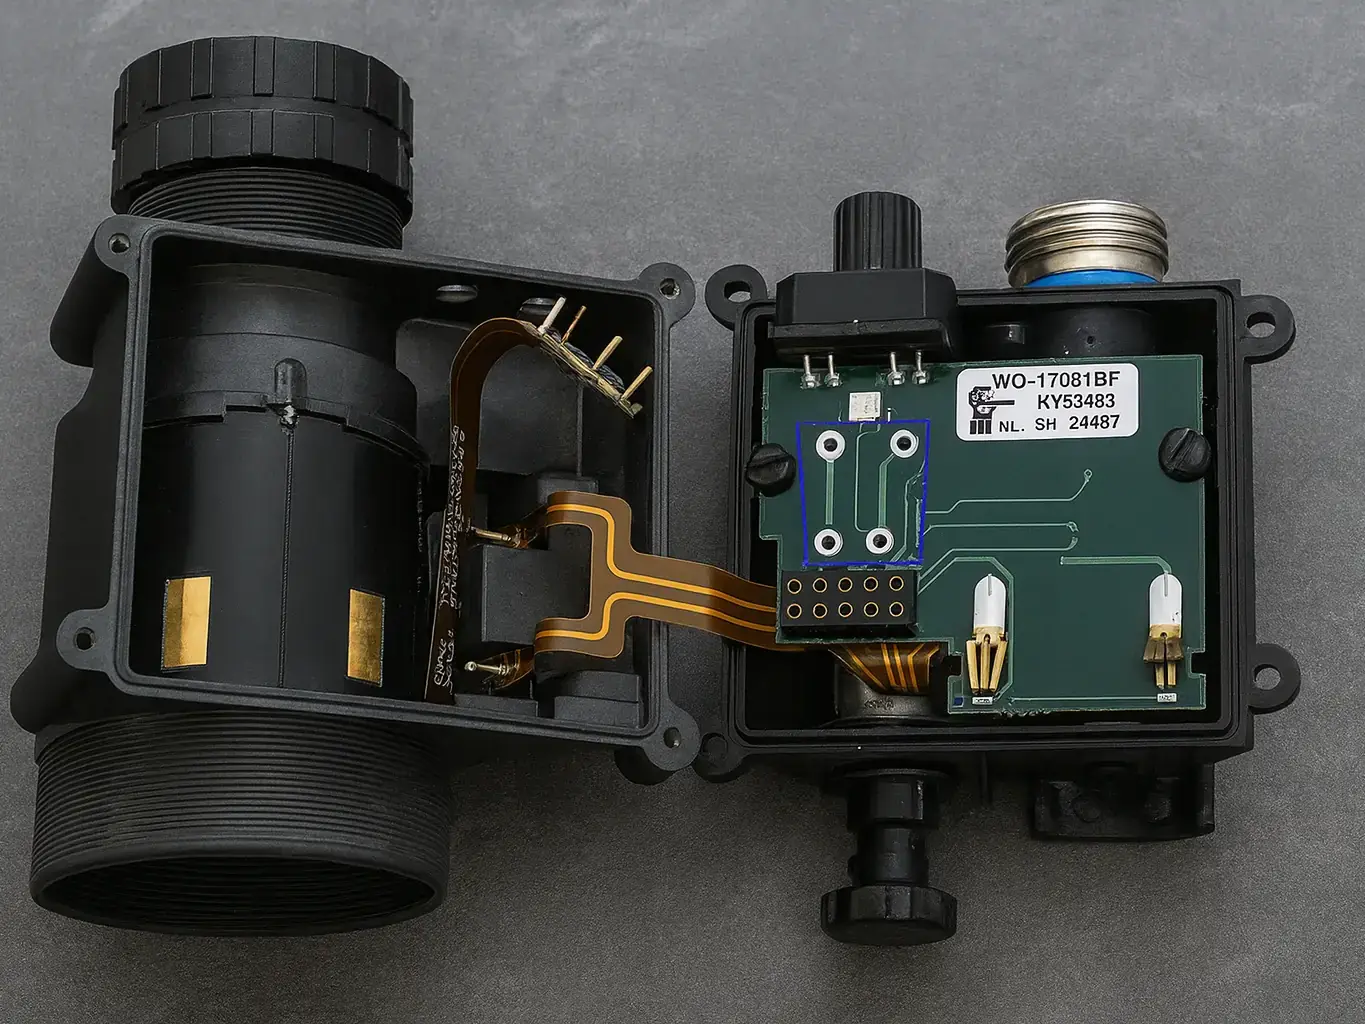
The next step in assembling the PVS-14 is to install the EEPROM. If you are using a Type 11769 EEPROM with a flexible cable, insert the cable first. Then carefully insert the EOP itself. There is a small notch on the bottom edge of the ECD - align it with the lock in the monocular body. Before final installation, blow out the EOF with compressed air from a can.
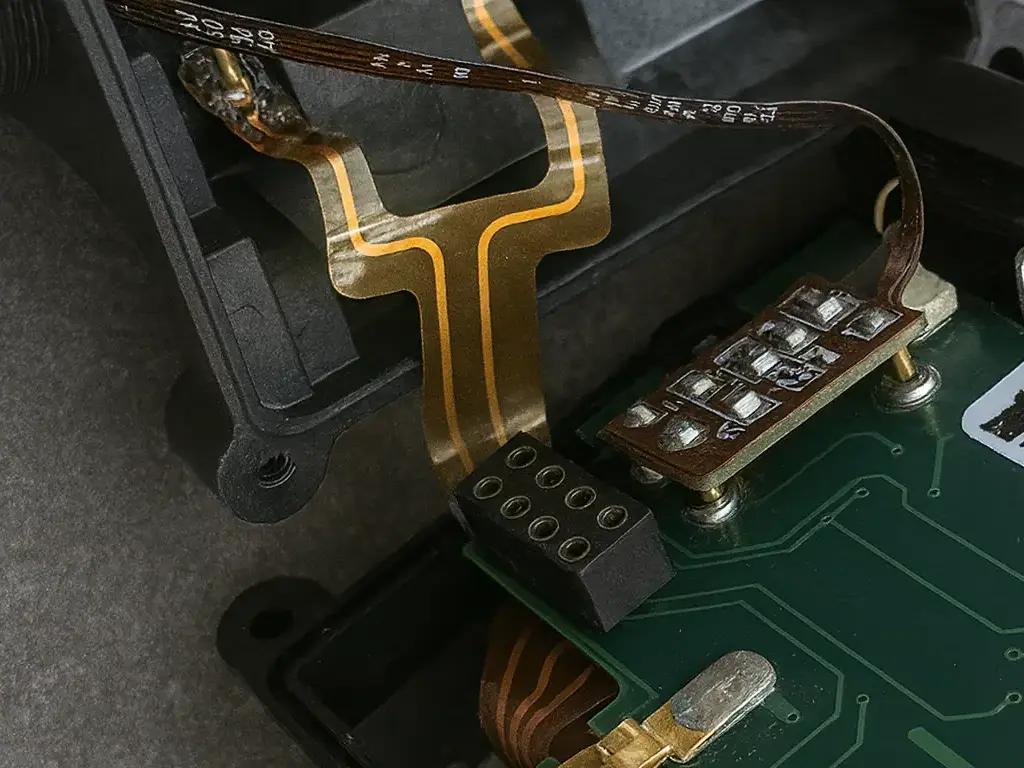
This step applies only to the 11769 type EOP. If you have a model 10160, skip this step. The 11769 flexible cable has a small chip with four pins that correspond to the holes on the battery compartment board (marked in blue). Connect the chip to the board according to the orientation of the pins.
The photo below shows a partially installed chip. Press gently until it touches the surface of the board.
Inside the monocular housing is a metal pin that is epoxied to the monocular body. This is an anti-rotation lock that keeps the electron-optical transducer (EOT) in the correct position after installation.
Installation of the EOP
The next step in assembling the PVS-14 is to install the EEPROM. If you are using a Type 11769 EEPROM with a flexible cable, insert the cable first. Then carefully insert the EOP itself. There is a small notch on the bottom edge of the ECD - align it with the lock in the monocular body. Before final installation, blow out the EOF with compressed air from a can.
This step applies only to the 11769 type EOP. If you have a model 10160, skip this step. The 11769 flexible cable has a small chip with four pins that correspond to the holes on the battery compartment board (marked in blue). Connect the chip to the board according to the orientation of the pins.
The photo below shows a partially installed chip. Press gently until it touches the surface of the board.
For Photonis ECHO or 4G series ECDs, the 10160 form factor without a flexible cable is usually used. Such converters are installed without additional connection to the board - just correctly orient the notch on the EOS body relative to the lock in the monocular and gently insert it until it stops.
Carefully fold the battery case around the monocular body, making sure that the cable ties are properly folded inward.
On the side of the AA battery compartment, one of the screw lugs has a special cutout for attaching the battery cover cord. Before screwing the cases together, secure the cord in this notch.
Using a 5/64" hex wrench, tighten the four screws of the battery compartment housing.
Next, replace the electronic optical converter (EOC) in its seat. If you do not, the EOS may become dislodged and not be in contact with the batteries. If it becomes dislodged, you can easily return it to its seat by gently tapping the housing down into the palm of your hand, which will reconnect the contacts and resume operation.
A low-cost fixation option is to place a light pipe on top of the EOL, which transmits light from the internal indicators to the eyepiece. The small rectangular protrusion on the light pipe should be located above the place where the pigtail of the MX-11769 type is connected to the EOL.
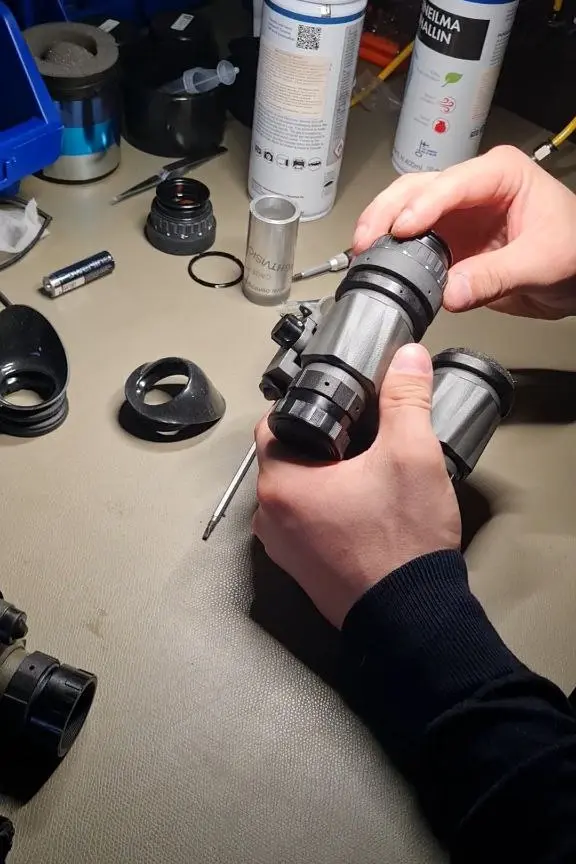
The next step is to install the fixing ring of the EOP. To do this, you will need an old credit or hotel card cut to the width of the ring. You can also use a small flathead screwdriver, but the card allows you to press evenly and fix the ring tightly without damage.
Install the eyepiece retaining ring and the eyepiece. Be careful when screwing on the eyepiece - the threads on the monocular body are very fine and made of polymer, so it is easy to misalign.
For Photonis ECHO or 4G series ECDs, the 10160 form factor without a flexible cable is usually used. Such converters are installed without additional connection to the board - just correctly orient the notch on the EOS body relative to the lock in the monocular and gently insert it until it stops.
Carefully fold the battery case around the monocular body, making sure that the cable ties are properly folded inward.
On the side of the AA battery compartment, one of the screw lugs has a special cutout for attaching the battery cover cord. Before screwing the cases together, secure the cord in this notch.
Using a 5/64" hex wrench, tighten the four screws of the battery compartment housing.
Next, replace the electronic optical converter (EOC) in its seat. If you do not, the EOS may become dislodged and not be in contact with the batteries. If it becomes dislodged, you can easily return it to its seat by gently tapping the housing down into the palm of your hand, which will reconnect the contacts and resume operation.
A low-cost fixation option is to place a light pipe on top of the EOL, which transmits light from the internal indicators to the eyepiece. The small rectangular protrusion on the light pipe should be located above the place where the pigtail of the MX-11769 type is connected to the EOL.
The next step is to install the fixing ring of the EOP. To do this, you will need an old credit or hotel card cut to the width of the ring. You can also use a small flathead screwdriver, but the card allows you to press evenly and fix the ring tightly without damage.
Install the eyepiece retaining ring and the eyepiece. Be careful when screwing on the eyepiece - the threads on the monocular body are very fine and made of polymer, so it is easy to misalign.
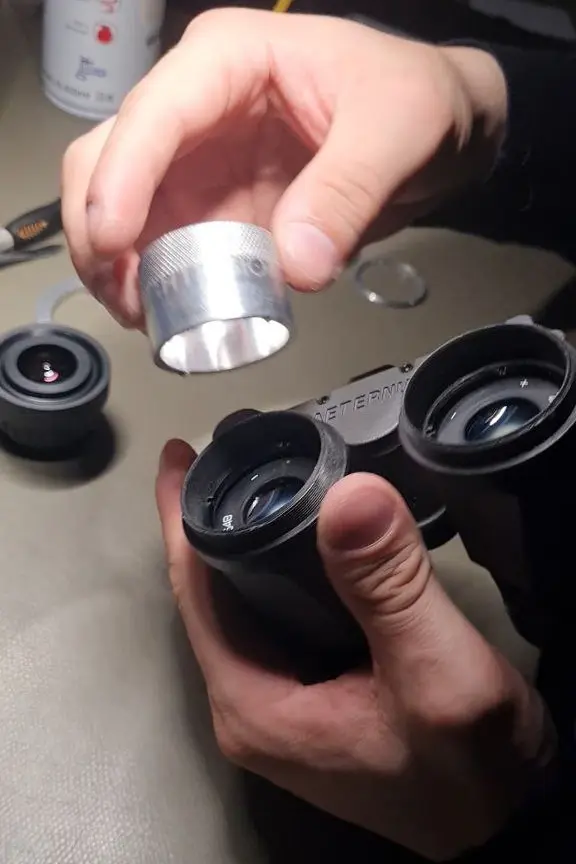
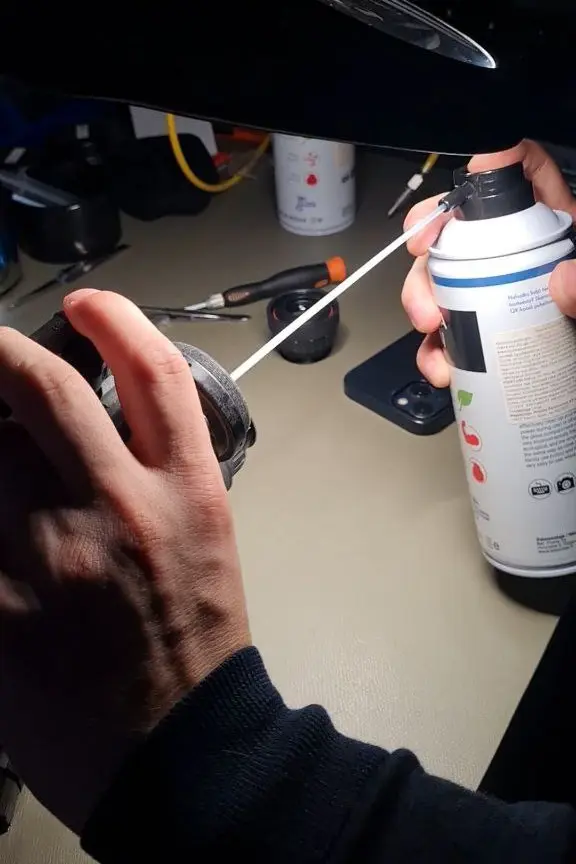
Before installation, clean the EOP and eyepiece from dust with a compressed air can or optical cleaning pen.
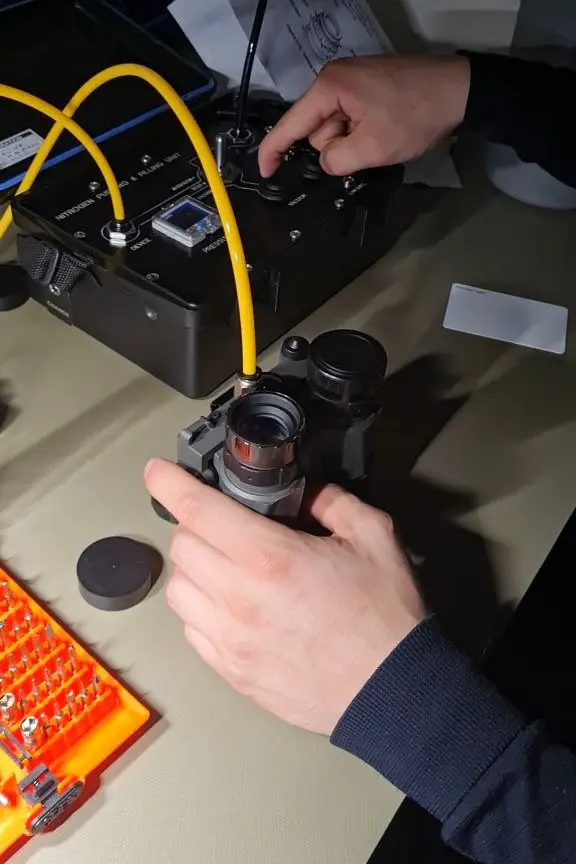
The last step is to install the purge screw and O-ring. Factory-built night vision devices are usually purged, and special equipment is used for this purpose. If you have access to such equipment, it greatly simplifies the procedure, especially for the PVS-14. However, in dry climates, purging is not necessary. In humid environments, fogging of the interior surfaces is possible without blowing.
There are home-made purging methods. One of them is to use a can of compressed air: gently blow the air into the purge hole and quickly tighten the screw. This should replace the air inside the chassis and reduce the risk of condensation. Another method is to use nitrogen purging kits for wine bottles, although there is no practical evidence of its effectiveness.
After assembling the PVS-14, you need to adjust the focus to the user's vision. First, while looking through the eyepiece, rotate the focusing lens to focus on an object at a distance of approximately 3 meters. It is advisable to choose an object with large text or small details.
Next, adjust the rear eyepiece, which has built-in diopter correction. Achieve maximum image clarity through this eyepiece. After that, return to the front eyepiece and adjust it to focus to infinity.
Before installation, clean the EOP and eyepiece from dust with a compressed air can or optical cleaning pen.
The last step is to install the purge screw and O-ring. Factory-built night vision devices are usually purged, and special equipment is used for this purpose. If you have access to such equipment, it greatly simplifies the procedure, especially for the PVS-14. However, in dry climates, purging is not necessary. In humid environments, fogging of the interior surfaces is possible without blowing.
There are home-made purging methods. One of them is to use a can of compressed air: gently blow the air into the purge hole and quickly tighten the screw. This should replace the air inside the chassis and reduce the risk of condensation. Another method is to use nitrogen purging kits for wine bottles, although there is no practical evidence of its effectiveness.
After assembling the PVS-14, you need to adjust the focus to the user's vision. First, while looking through the eyepiece, rotate the focusing lens to focus on an object at a distance of approximately 3 meters. It is advisable to choose an object with large text or small details.
Next, adjust the rear eyepiece, which has built-in diopter correction. Achieve maximum image clarity through this eyepiece. After that, return to the front eyepiece and adjust it to focus to infinity.
Final cost of PVS-14 assembly
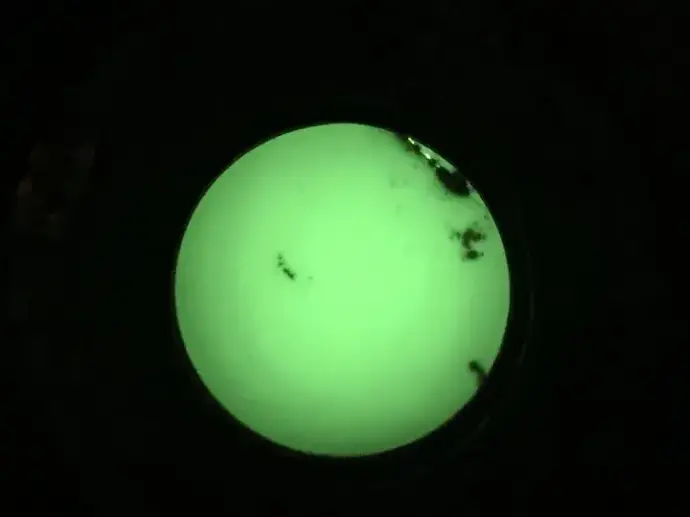
Is it cheaper to assemble the device from new components? Not quite. The bulk of the cost is for the electronic optical converter (EOC). Its retail price starts at about €2,000 and can be much higher, depending on the characteristics. EOCs with a white phosphor are usually more expensive than those with a green phosphor. At the same time, as in the case of second-hand weapons, it is sometimes possible to find bargains among so-called "blem tubes" — EOLs with cosmetic defects. There is no single source for such purchases — you need to monitor the market.
Below is an example of what might be called "incredibly cheap." This EOF has significant defects, but most of them are located in zone 3 (the periphery of the image) and one small one in zone 2. The central zone 1 remains relatively clean. This EOF is quite suitable for shooting at night on an open range.
Final cost of PVS-14 assembly
Is it cheaper to assemble the device from new components? Not quite. The bulk of the cost is for the electronic optical converter (EOC). Its retail price starts at about €2,000 and can be much higher, depending on the characteristics. EOCs with a white phosphor are usually more expensive than those with a green phosphor. At the same time, as in the case of second-hand weapons, it is sometimes possible to find bargains among so-called "blem tubes" — EOLs with cosmetic defects. There is no single source for such purchases — you need to monitor the market.
Below is an example of what might be called "incredibly cheap." This EOF has significant defects, but most of them are located in zone 3 (the periphery of the image) and one small one in zone 2. The central zone 1 remains relatively clean. This EOF is quite suitable for shooting at night on an open range.
Before installing the EOP, you can insert it into the battery compartment to check its functionality. This should be done in a dark room. Most third-generation EOLs are auto-gated, so the risk of damage due to excessive light is minimal. However, do not allow daylight to reach the photocathode.
Not all night vision devices use electron-optical transducers (EOTs) with a diameter of 16 or 18 mm, as shown in this article. These dimensions are typical for many modern systems, in particular for the PVS-14 form factor, but are not universal.
PVS-14 format EOPs are typically 18 mm in diameter and are used in monoculars, binoculars, and helmet systems. However, other formats exist, for example:
- 25 mm - in older or specialized models
- 16 mm - for compact or lightweight systems
- Microformats for the latest miniaturized devices
EOL compatibility depends on the design of the instrument housing. For example, PVS-14 enclosures are designed for 18 mm EOPs, while other models may require a different diameter or length.
Ready-made night vision devices PVS-14
Assembling it yourself is interesting, but when it comes to combat reliability, it is better to choose ready-made solutions. Thorsen offers a wide range of professionally assembled, calibrated, and nitrogen-filled instruments in original MIL-SPEC and Photonis EOPs (FOM 1400-2400), proven in the most demanding environments. You get an instrument that is ready to go right away.
View the catalogReady-made night vision devices PVS-14
Assembling it yourself is interesting, but when it comes to combat reliability, it is better to choose ready-made solutions. Thorsen offers a wide range of professionally assembled, calibrated, and nitrogen-filled instruments in original MIL-SPEC and Photonis EOPs (FOM 1400-2400), proven in the most demanding environments. You get an instrument that is ready to go right away.
View the catalogRead more about night vision: history, technology, practice
- 🔹 Photonis (Exosens) - a line of modern CCDs
- 🔹 Elbit America - AN/PVS-14 (F6015): official page of the device
- 🔹 USMC - "Night Optics & Observation Theory": a basic guide to NVP (PDF)
- 🔹 Opto-Electronics Review - "Review of Night Vision Technology"
- 🔹 Opto-Electronics Review - "Review of Night Vision Metrology"
- 🔹 Sandia/OSTI - "History and Evolution of the Johnson Criterion" (PDF)
- 🔹 Armasight - PVS-14 user manual (based on TM 11-5855-306-10, PDF)
Read more about night vision: history, technology, practice
- 🔹 Photonis (Exosens) - a line of modern CCDs
- 🔹 Elbit America - AN/PVS-14 (F6015): official page of the device
- 🔹 USMC - "Night Optics & Observation Theory": a basic guide to NVP (PDF)
- 🔹 Opto-Electronics Review - "Review of Night Vision Technology"
- 🔹 Opto-Electronics Review - "Review of Night Vision Metrology"
- 🔹 Sandia/OSTI - "History and Evolution of the Johnson Criterion" (PDF)
- 🔹 Armasight - PVS-14 user manual (based on TM 11-5855-306-10, PDF)

How to assemble the PVS-14: components, assembly, and setup